
使用 Meteor.js 3、Vue 3 和 `vue-meteor-tracker` 构建应用
在本教程中,我们将使用 Vue 3 和 Meteor 3.0 创建一个简单的待办事项应用。Meteor 可以很好地与其他框架协同工作,例如 Blaze、React、Solid 和 Svelte。
Vue.js 是一个功能强大的 JavaScript 框架,用于创建用户界面。它通过使用连接到数据的模板并自动更新数据变化来帮助你构建交互式应用程序。Vue.js 模板使用类似于 HTML 的简单语法,并与 Vue 的反应式系统协同工作,以便在浏览器中显示组件。
要开始构建你的 Vue.js 应用程序,你需要一个代码编辑器。如果你不确定选择哪个,Visual Studio Code 是一个不错的选择。安装后,你可以通过添加一些扩展来增强你的体验,例如 Meteor 工具箱 和 Vue 语言特性。
警告
本教程使用 `vue-meteor-tracker` 包,该包目前处于测试阶段,尚不支持异步调用。但是,它仍然是一个有价值的包,我们希望它很快就会更新。我们还在编写一个新的教程,它将使用 Meteor 核心包。
让我们开始构建你的应用程序吧!
目录
1:创建应用
1.1:安装 Meteor.js
首先,确保你已安装 Node.js 版本 20。你可以使用以下命令安装最新版本的 Meteor:
npx meteor如果你遇到任何问题,请参阅 我们的文档 中的要求和详细信息。
1.2:创建 Meteor.js 项目
要轻松地使用 Vue 设置 Meteor,请运行以下命令,将 `simple-todos-vue` 替换为你选择的项目名称:
meteor create --vue simple-todos-vue --release=3.0.2信息
你可以在我们的 GitHub 仓库 中找到此应用的最终版本。
Meteor 将为你创建所有必要的文件。`--vue` 标志使用 Vue、Vite 和 Tailwind CSS 生成一个项目。
你会发现 `client` 目录包含客户端设置的文件。在其中,应该有一个空的 `main.js` 文件,这是 Meteor 的导入模式所需的。但是,使用 Vite 时,入口点在 `vite.config.js` 文件中设置,指向 `imports/ui/main.js`,这是 Meteor 渲染主组件的位置。
检查服务器目录以获取服务器设置,在那里你会看到 `server/main.js` 使用一些默认数据填充你的 MongoDB 数据库。无需单独安装 MongoDB,因为 Meteor 包含一个嵌入式版本。
要运行你的应用,请使用:
meteor npm run start你的 Vue 代码将位于 `imports/ui 目录` 中,其中 `App.vue` 是你的应用的根组件。
花点时间浏览 Meteor 创建的文件。你不需要立即理解所有内容,但了解它们在哪里是有帮助的。
1.3:清理 UI 文件夹
让我们删除一些不必要的文件,以便更干净地开始。在 `imports/ui` 文件夹中仅保留 `App.vue`、`main.js` 和 `router.js`。删除以下文件:`About.vue`、`AppMenu.vue`、`Hello.vue`、`Home.vue` 和 `Info.vue`。
接下来,更新 `router.js` 以删除对已删除组件的引用:
import { createRouter, createWebHistory } from 'vue-router';
import App from './App.vue';

export const router = createRouter({
  history: createWebHistory(),
  routes: [
    {
      path: '/',
      name: 'home',
      component: App,
    },
  ],
});
在此文件中,你设置路由并确定为每个路径渲染哪个组件。
此外,由于某些组件不再存在,因此更新 App 组件。
<template>
  <div class="p-8">
    <h1>Hello Meteor</h1>
  </div>
</template>
1.4:创建示例任务
我们将在 `imports/ui/components` 文件夹中创建 Vue 组件。首先创建此文件夹,并在其中添加一个名为 `Task.vue` 的文件。
此文件将导出一个名为 `Task` 的 Vue 组件,表示待办事项列表中的单个任务。
<script setup>
defineProps({
  task: {
    type: Object,
    required: true,
  },
});
</script>

<template>
  <li>{{ task.text }}</li>
</template>
由于 `Task` 组件将是列表的一部分,因此它返回一个 `li` 元素。
现在,我们不会连接到数据库,因此在 `App.vue` 文件中定义一些示例数据以显示任务列表。创建一个数组和一个函数来返回此数组。
<script setup>
import Task from './components/Task.vue'

const getTasks = () => {
    return [
      { _id: 1, text: 'Install Node.js 20' },
      { _id: 2, text: 'Install Meteor 3' },
      { _id: 3, text: 'Create and run your project' },
    ];
}
</script>

<template>
  <div class="p-8">
    <h1>Hello Meteor</h1>
  </div>
</template>
1.5:渲染任务
现在让我们使用 Vue 添加一些简单的渲染逻辑,以使用 `Task` 组件显示列表项。
更新 `App` 组件的模板以包含任务列表:
<script setup>
import Task from './components/Task.vue'

const getTasks = () => {
    return [
      { _id: 1, text: 'Install Node.js 20' },
      { _id: 2, text: 'Install Meteor 3' },
      { _id: 3, text: 'Create and run your project' },
    ];
}
</script>
<template>
  <div class="container">
    <header>
      <h1 class="text-4xl font-bold text-gray-800 my-4">Todo List</h1>
    </header>
    <ul class="list-disc list-inside p-4">
      <Task v-for="task in getTasks()" :key="task._id" :task="task" />
    </ul>
  </div>
</template>
有关 Vue 迭代的更多信息,你可以阅读 此处。
在下一步中,我们将连接到 MongoDB 数据库以存储我们的任务。
2:集合
Meteor 已经为你设置了 MongoDB。为了使用我们的数据库,我们需要创建一个 *集合*,我们将在其中存储我们的 *文档*,在本例中是我们的 `tasks`。你可以阅读更多关于集合的信息 此处。
在此步骤中,我们将实现所有必要的代码,使我们的任务的基本集合能够运行起来。
2.1:创建任务集合
在创建集合之前,让我们从 `imports/api` 文件夹中删除 `links.js` 文件,因为我们不会使用它。现在,你可以通过在 `imports/api` 文件夹中创建一个名为 `tasksCollection.js` 的新文件来创建一个新的集合来存储我们的任务。
import { Mongo } from 'meteor/mongo';

export const TasksCollection = new Mongo.Collection('tasks');
上面的代码实例化了一个新的 MongoDB 集合并将其导出。你可以阅读更多关于应用程序结构和导入/导出信息 此处。
2.2:初始化任务集合
要使我们的集合工作,你需要在服务器上导入它以进行设置。
你可以使用 `import './imports/api/tasksCollection'` 或 `import { TasksCollection } from './imports/api/tasksCollection'`(如果你计划在同一文件中使用 `TasksCollection`)。只需确保它已导入。
现在,很容易检查集合中是否存在数据,或者我们可以轻松添加一些示例数据。
将 `server/main.js` 中的旧内容替换为以下代码。
import { Meteor } from 'meteor/meteor';
import { TasksCollection } from '../imports/api/tasksCollection';

const insertTask = async text => await TasksCollection.insertAsync({text});

Meteor.startup(async () => {
  const tasksCount = await TasksCollection.find().countAsync();
  if (tasksCount === 0) {
    await insertTask('First Task');
    await insertTask('Second Task');
    await insertTask('Third Task');
    await insertTask('Fourth Task');
    await insertTask('Fifth Task');
    await insertTask('Sixth Task');
    await insertTask('Seventh Task');
  }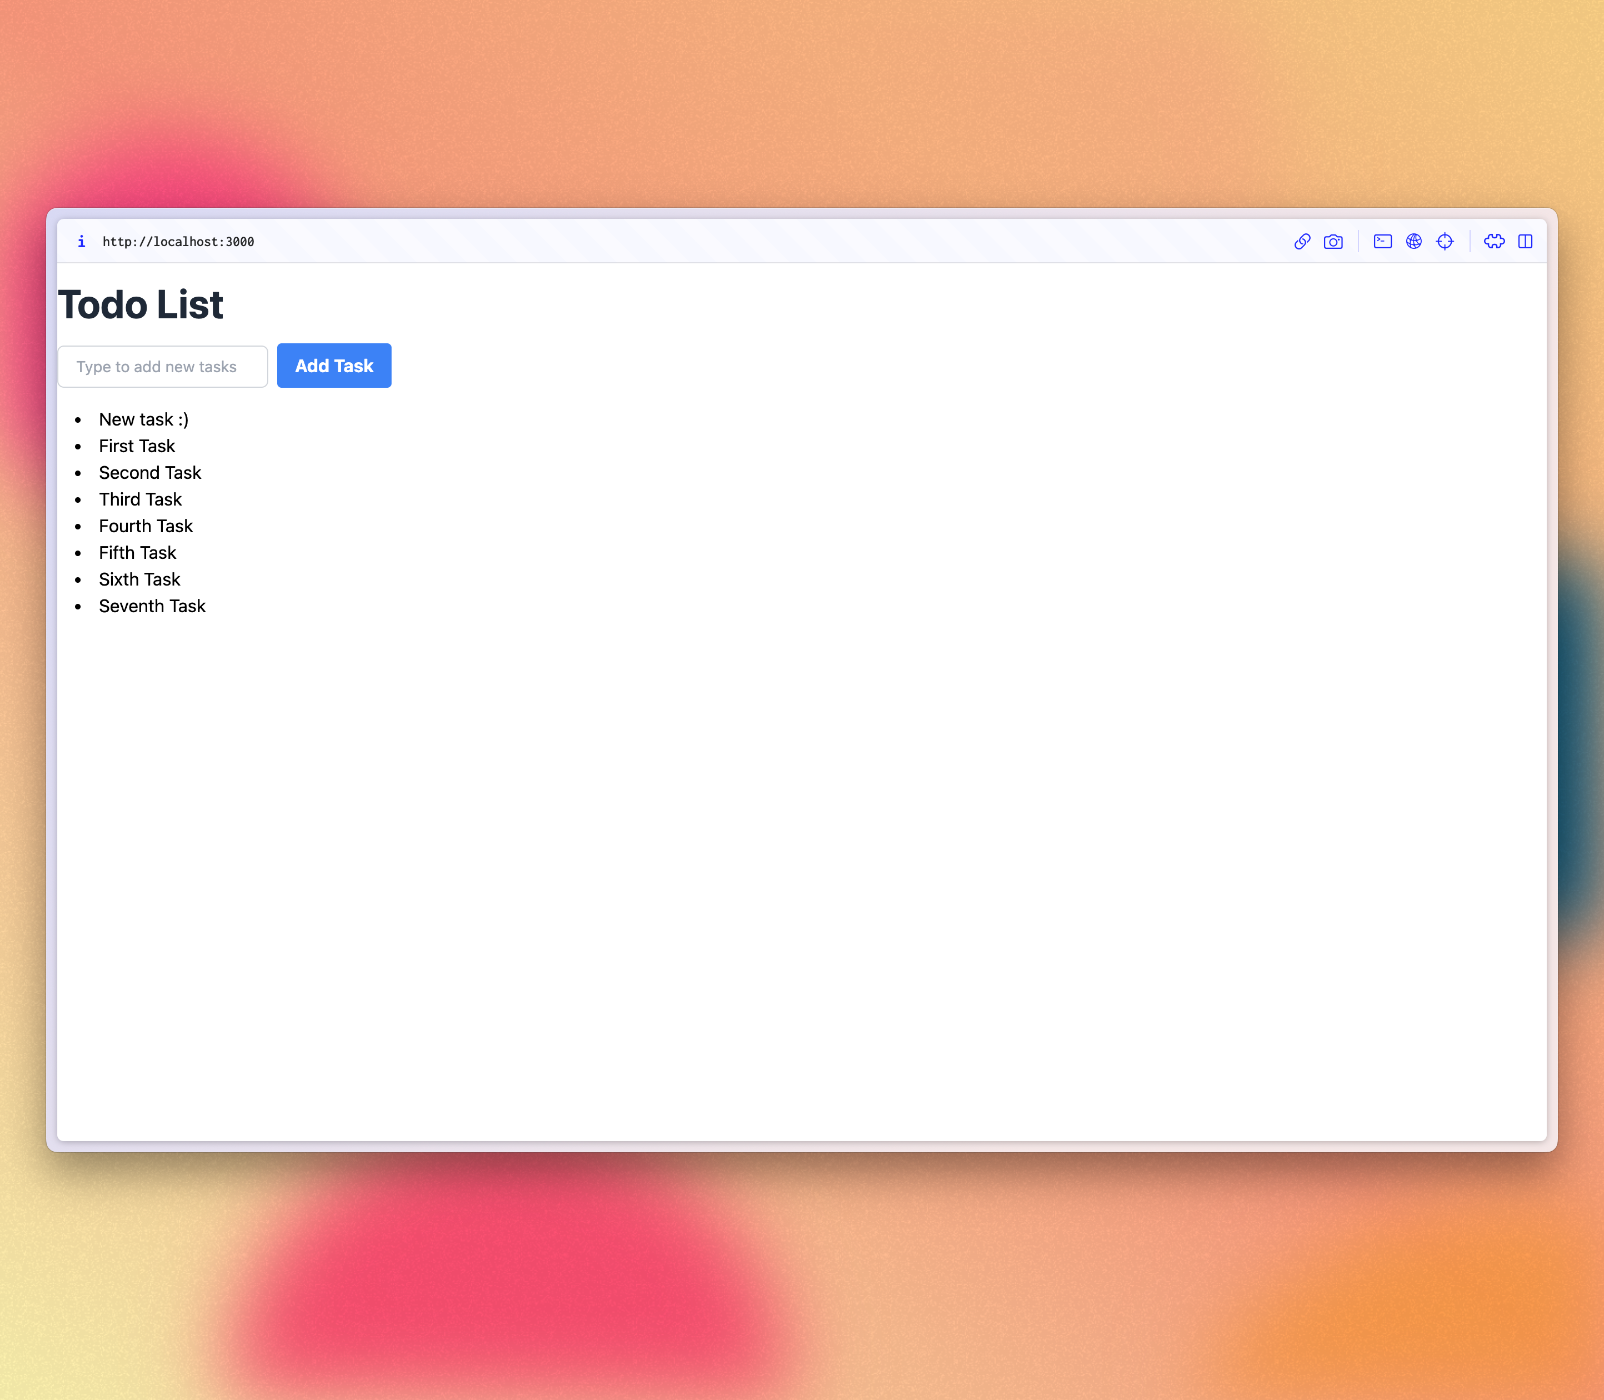
});因此,您正在导入TasksCollection并在其上添加一些任务,并调用一个函数将此字符串插入到我们的task文档中的text字段中。
2.3:渲染任务集合
现在到了有趣的部分,您将使用“数据容器”渲染任务,以将 Meteor 的响应式数据馈送到 Vue 的组件层次结构中。我们将使用vue-meteor-tracker包来实现这一点。
信息
Meteor 使用 Meteor 包和 NPM 包,通常 Meteor 包使用 Meteor 内部组件或其他 Meteor 包。
vue-meteor-tracker包已包含在 Vue 骨架中,因此您无需添加它。
从 Meteor 包导入代码时,与 NPM 模块唯一的区别是您需要在导入语句的 from 部分前面加上meteor/。
首先,我们需要在App组件中实现一个订阅,以获取来自服务器更新的任务。这可以通过简单地使用vue-meteor-tracker中的subscribe和autorun函数来完成。
信息
vue-meteor-tracker包尚不支持异步调用,因此我们需要使用同步函数。这不是问题,但了解这一点很重要。
<script setup>
import Task from './components/Task.vue';
import { subscribe, autorun } from 'vue-meteor-tracker';
import { TasksCollection } from '../api/tasksCollection';

subscribe('tasks');
const tasks = autorun(() => TasksCollection.find({}).fetch()).result;
</script>

<template>
  <div class="container">
    <header>
      <h1 class="text-4xl font-bold text-gray-800 my-4">Todo List</h1>
    </header>
    <ul class="list-disc list-inside p-4">
      <Task v-for="task of tasks" :key="task._id" :task="task" />
    </ul>
  </div>
</template>为了能够在客户端获取数据,您需要在服务器中发布它。为此,创建一个名为tasksPublications.js的文件并添加以下代码
import { Meteor } from 'meteor/meteor';
import { TasksCollection } from './tasksCollection';

Meteor.publish('tasks', function publishTasks() {
    return TasksCollection.find();
});
现在,在服务器上导入它
import '../imports/api/tasksPublications';如果您想了解更多关于发布如何工作的信息,您可以阅读Meteor 指南。
现在,您的应用程序应如下所示
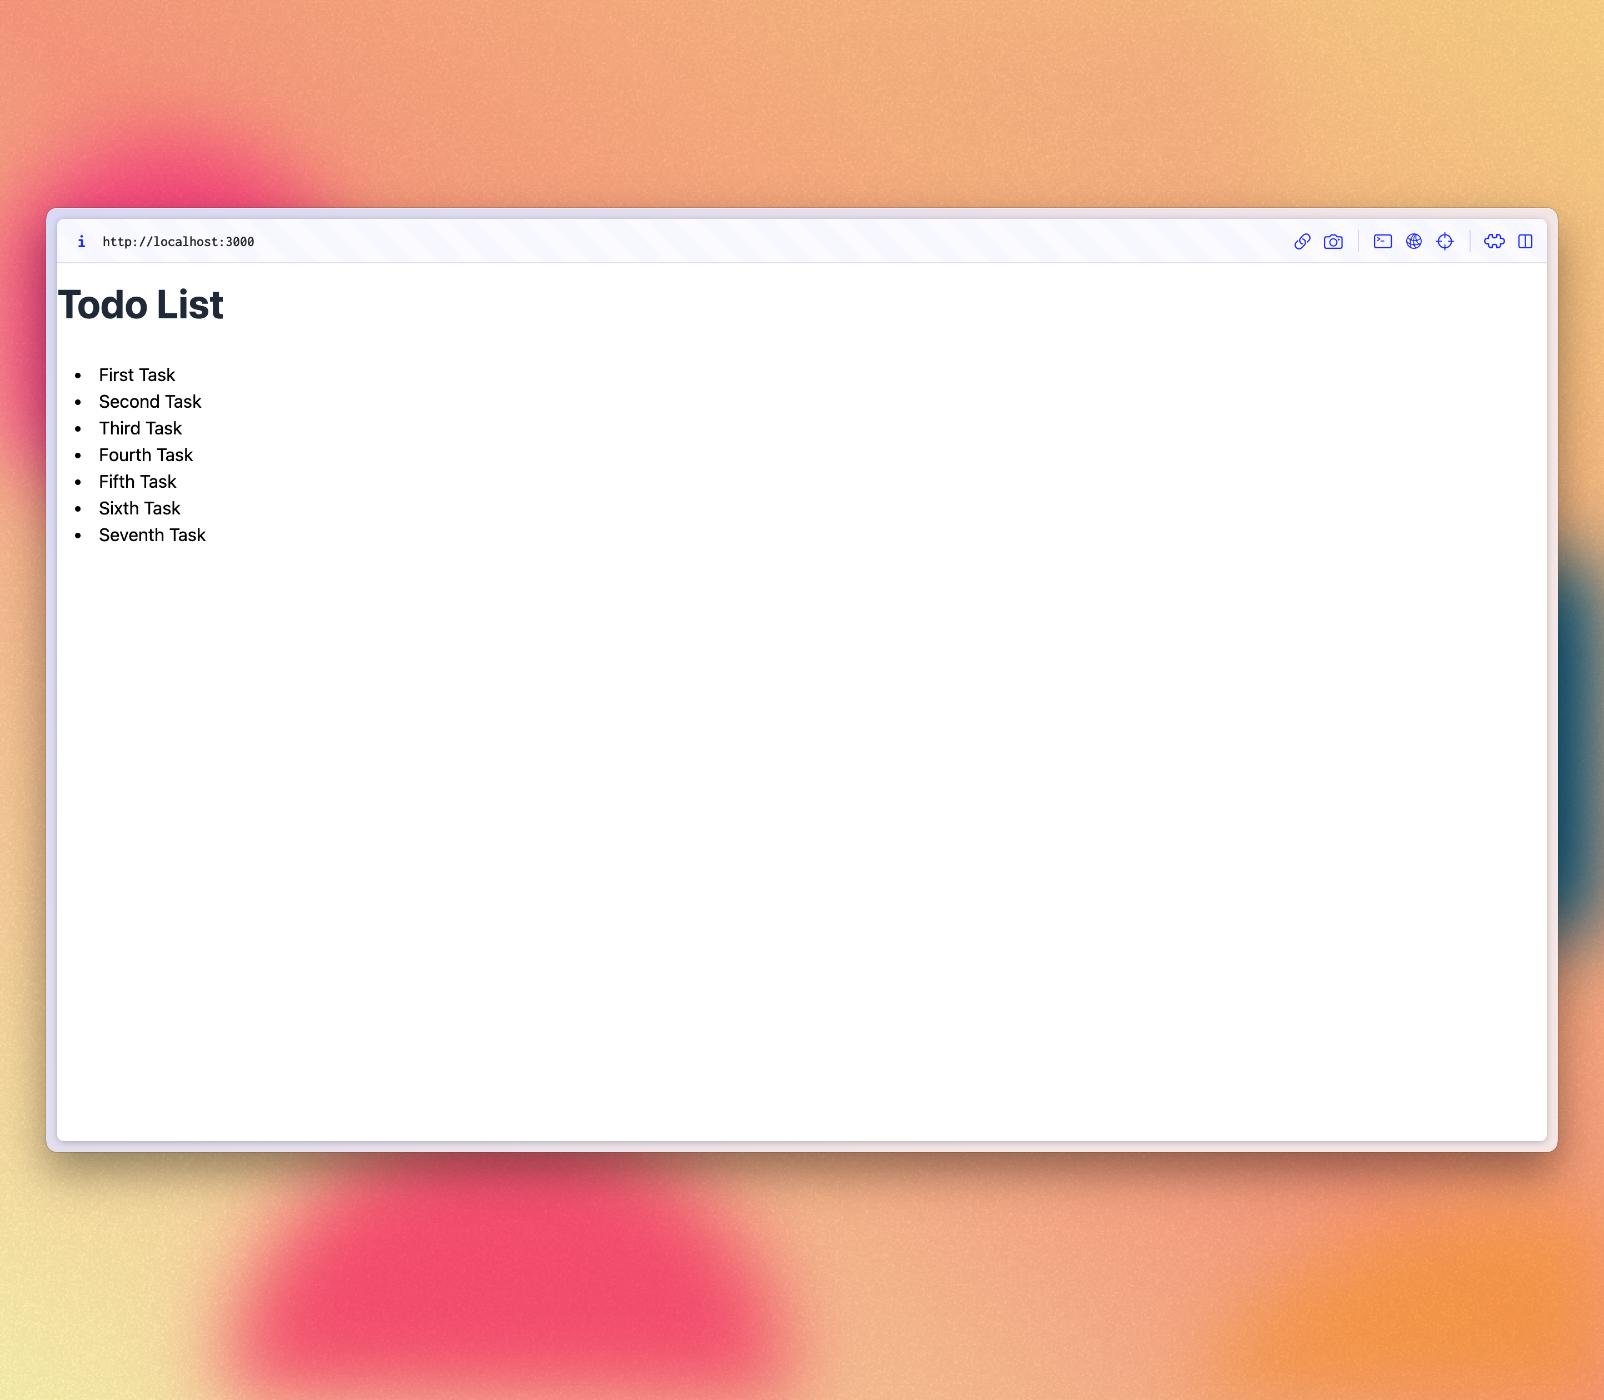
您可以在服务器上的 MongoDB 中更改数据,您的应用程序将做出反应并为您重新渲染。
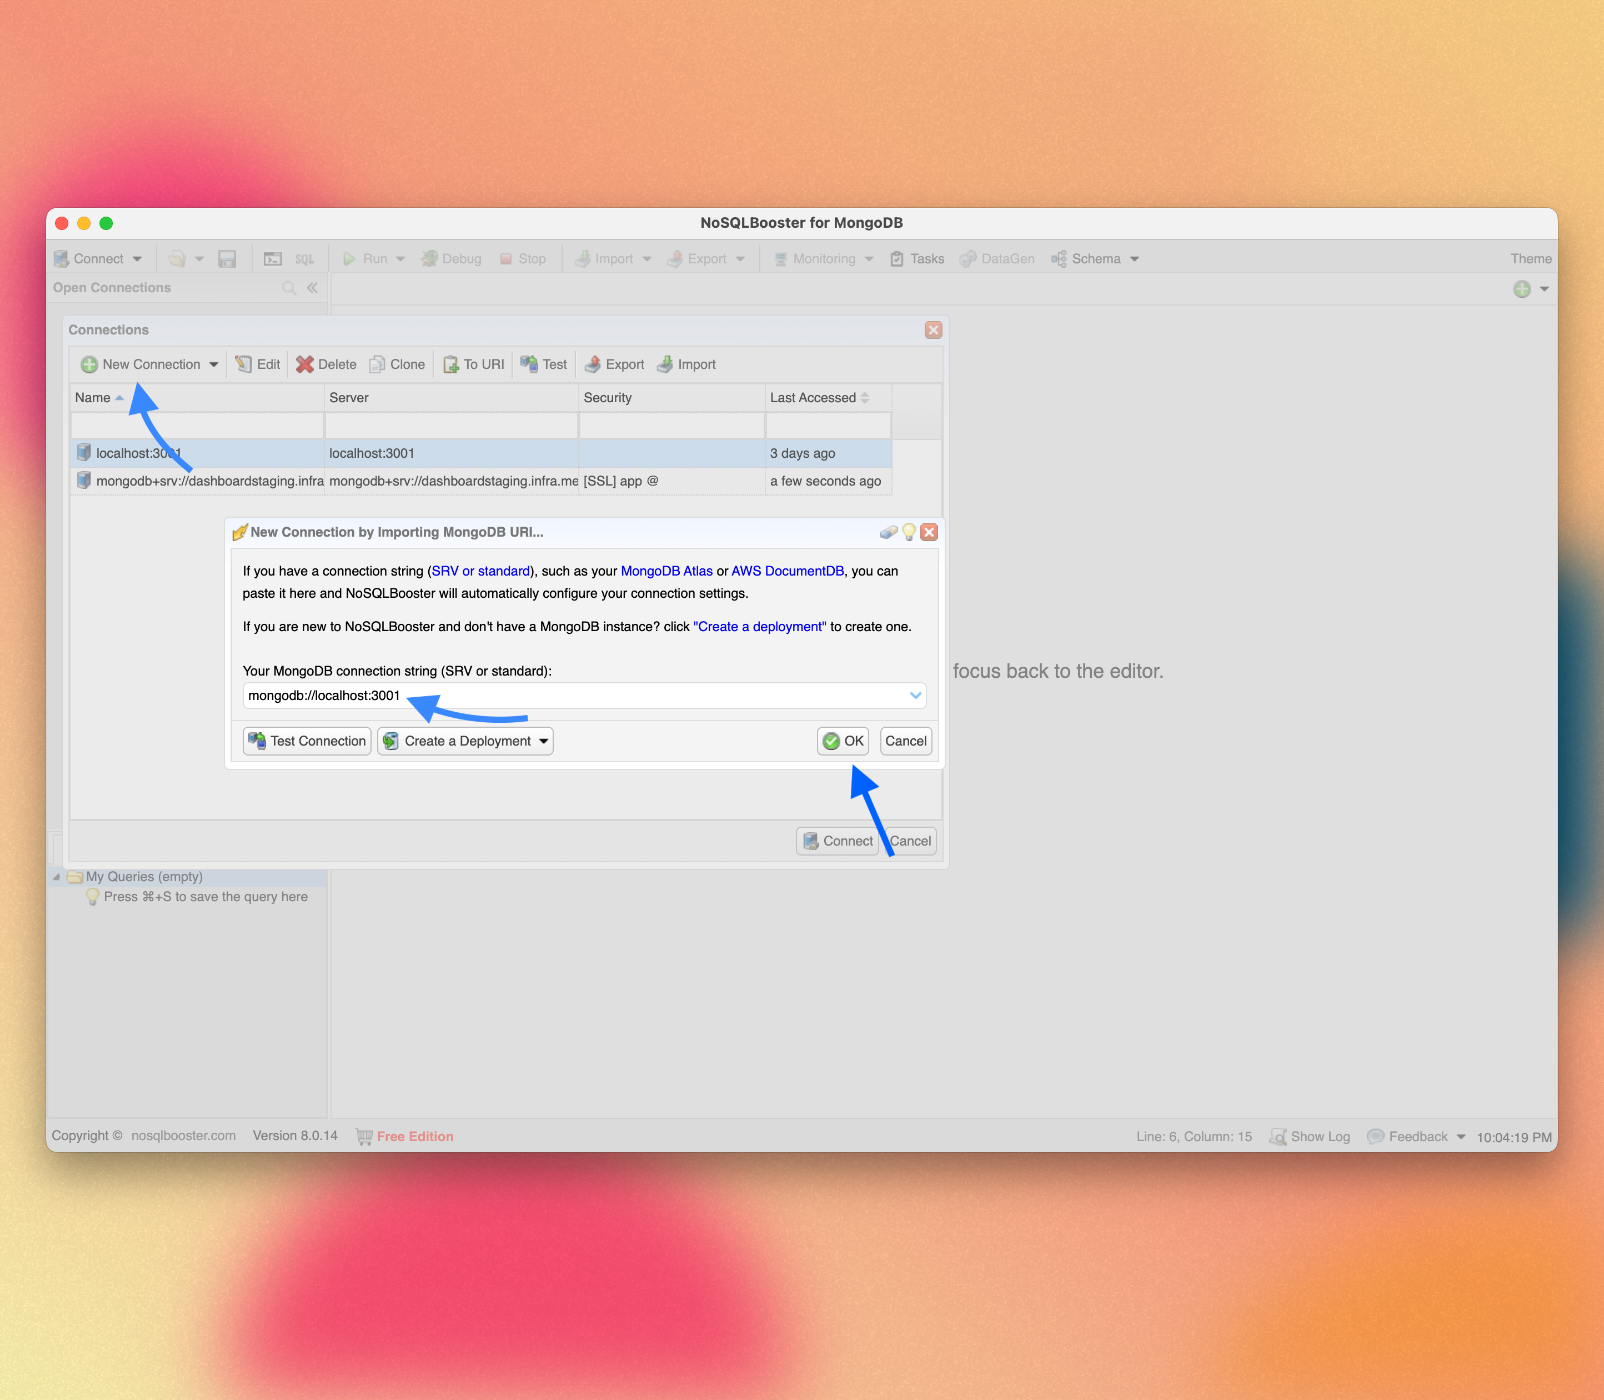
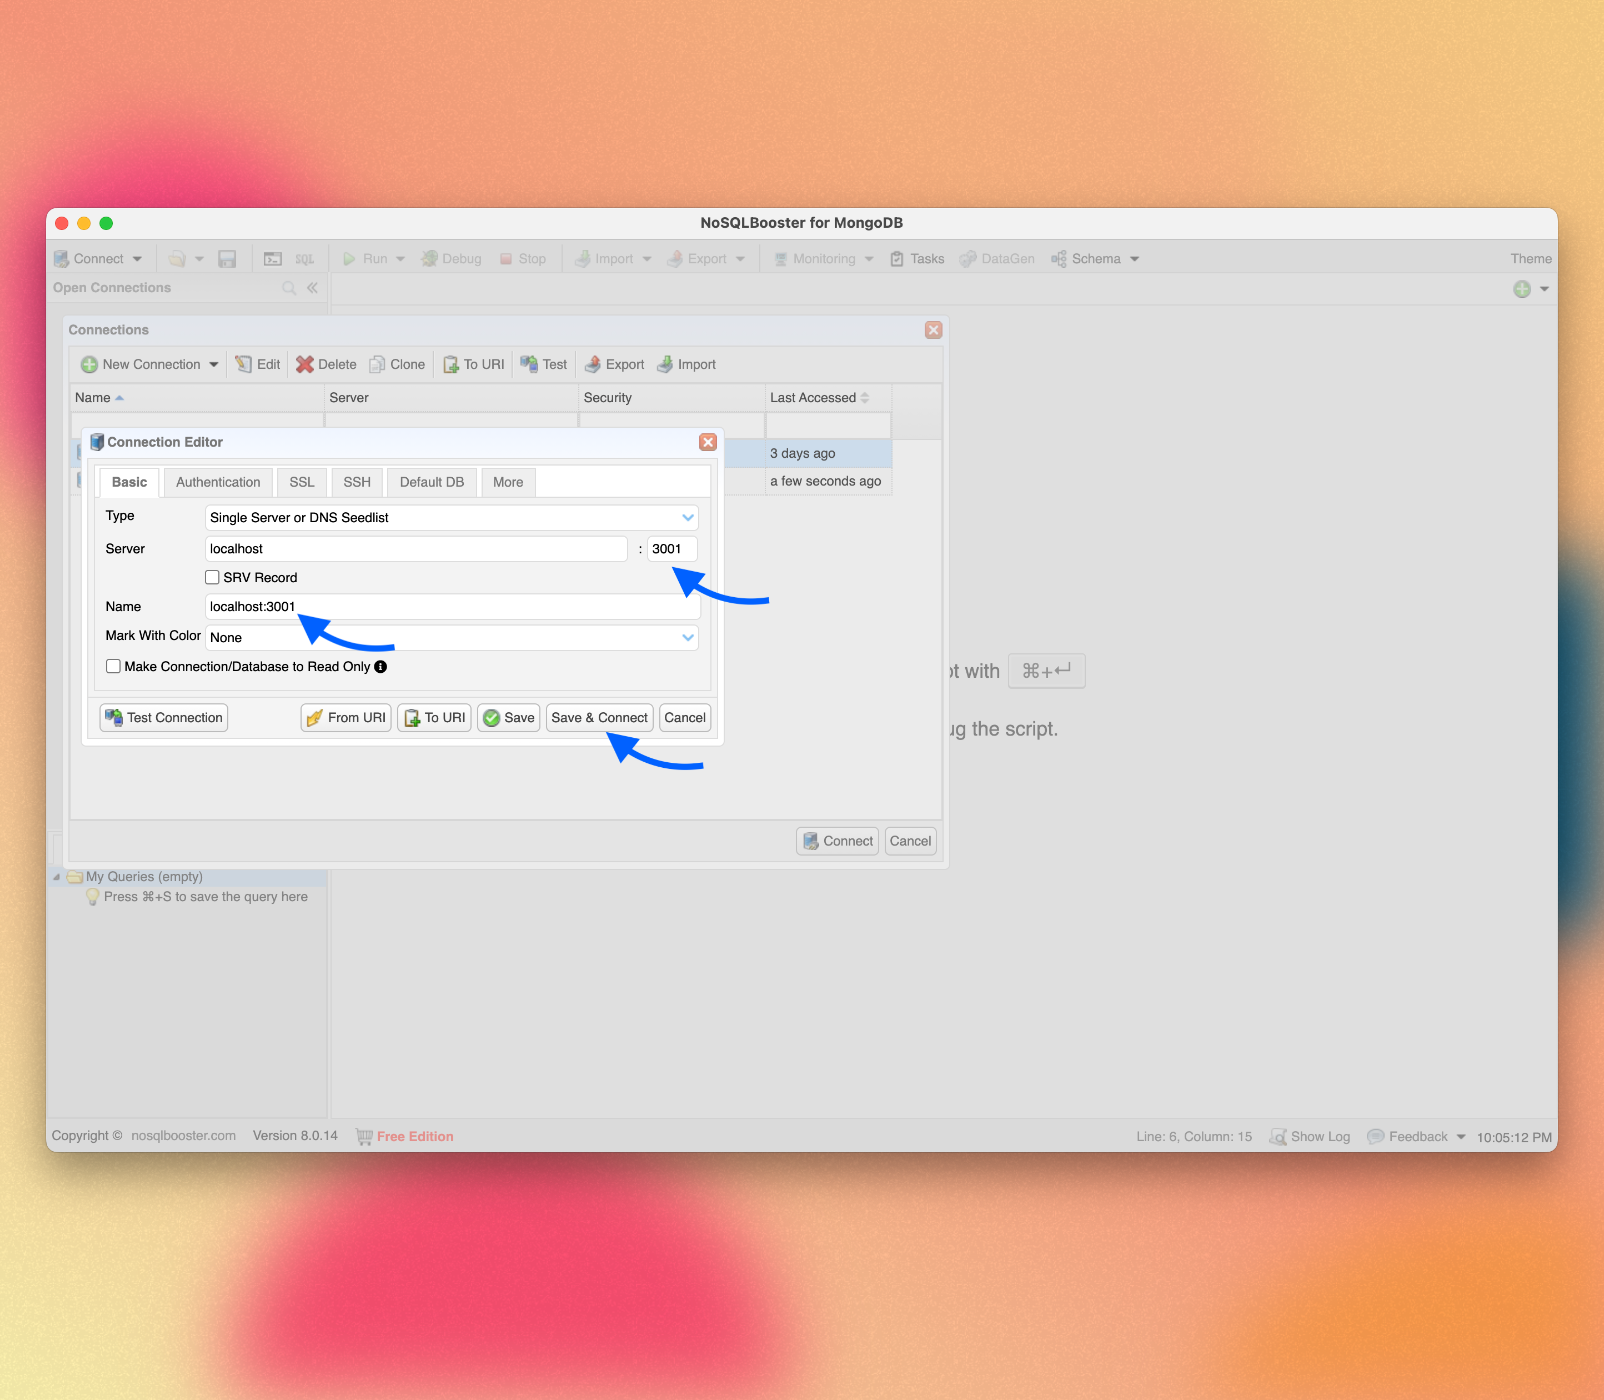
您可以通过在应用程序文件夹的终端中运行meteor mongo或使用 MongoDB UI 客户端(如NoSQLBooster或MongoDB Compass)连接到您的 MongoDB。您的嵌入式 MongoDB 正在端口3001上运行。
查看如何连接
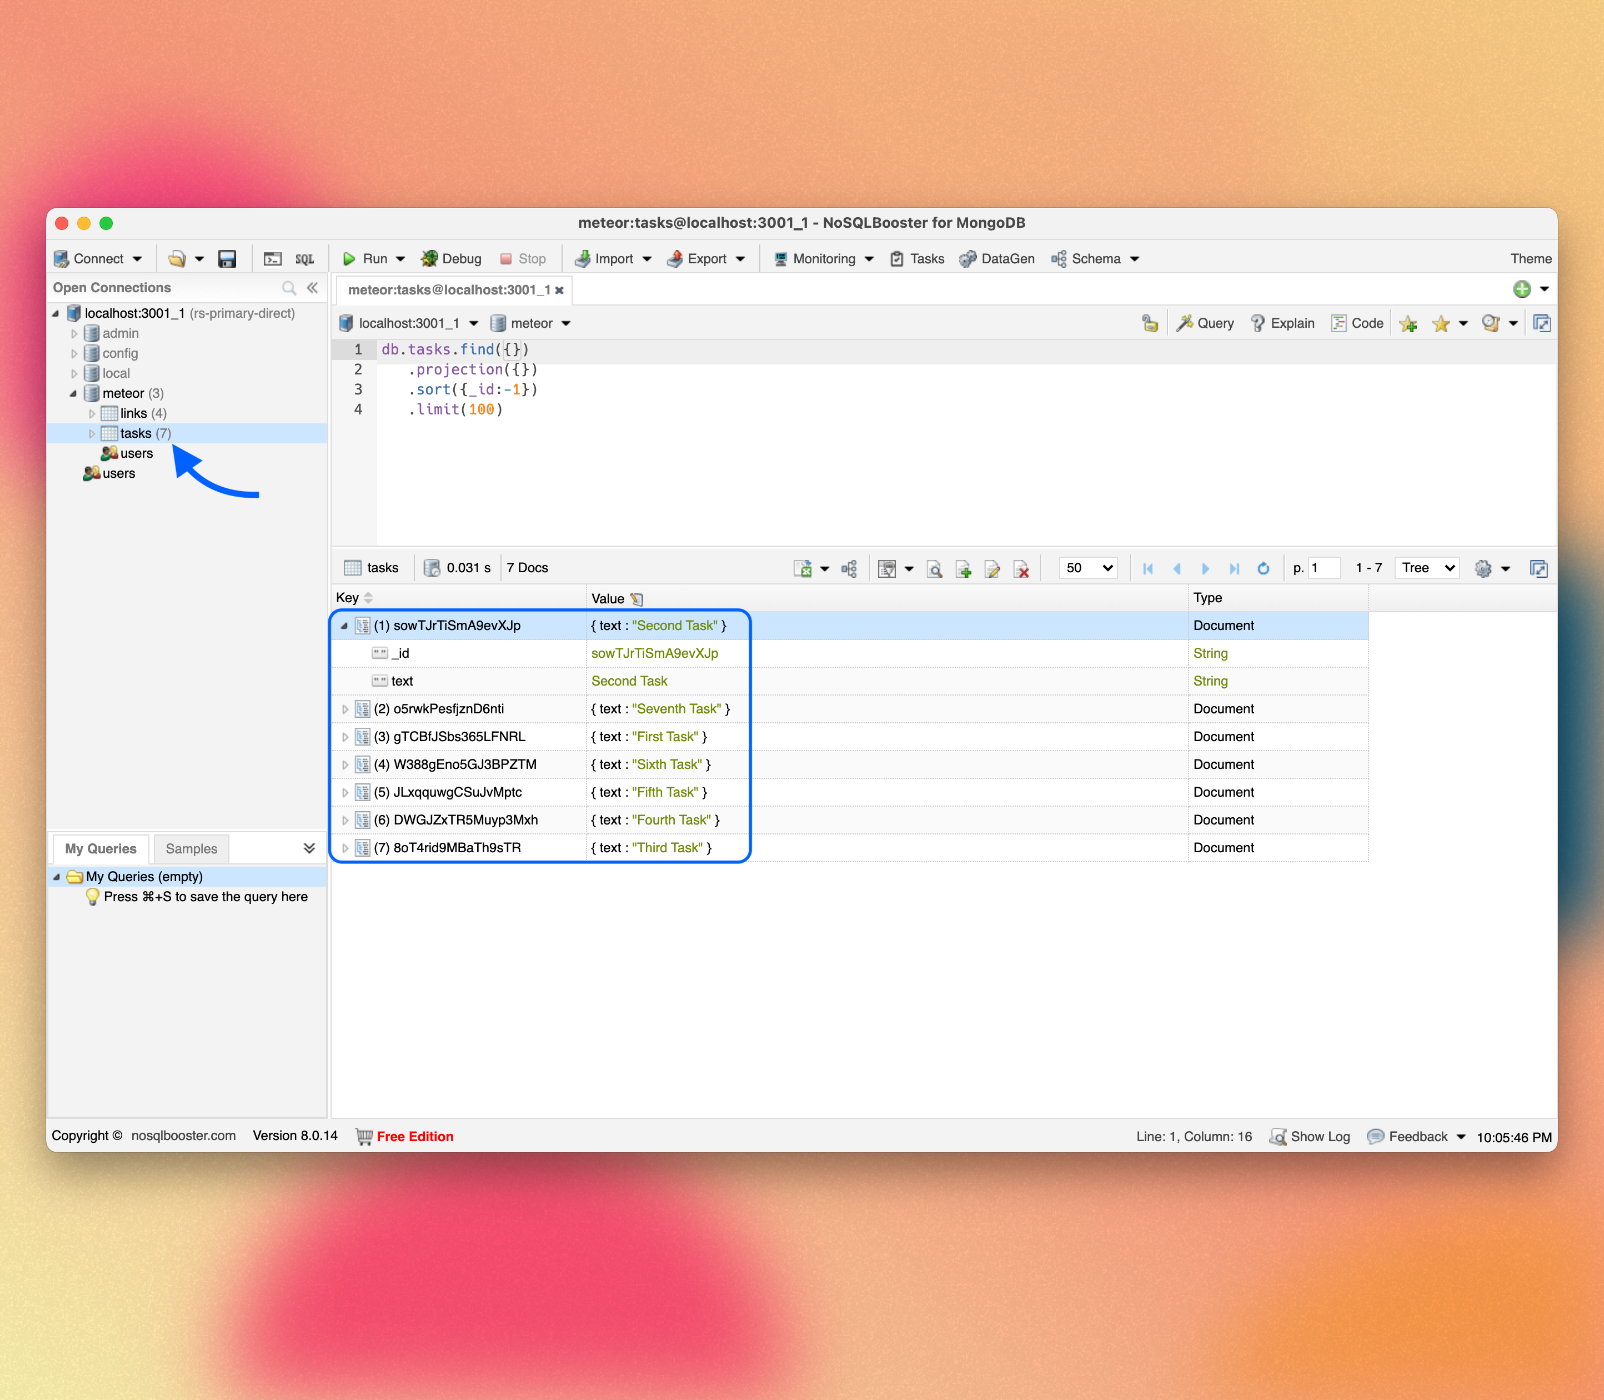
查看您的数据库
您可以双击您的集合以查看存储在其中的文档
3:表单和事件
现在,我们需要让用户与存储的数据进行交互。在我们的例子中,第一个交互是添加新的任务。用户在网站中插入或编辑数据的主要方法之一是通过表单,使用<form>标签。
3.1:创建任务表单
首先,我们需要创建一个简单的表单组件来封装我们的逻辑。
在您的ui/components文件夹中创建一个新文件TaskForm.vue。
<script setup>
import { ref } from 'vue';

const newTask = ref('');

const addTask = () => {
  console.log(newTask.value);
}
</script>

<template>
    <form @submit.prevent="addTask">
        <input
            v-model="newTask"
            class=" border border-gray-300 rounded-md py-2 px-4 mr-2 text-gray-600 text-sm focus:outline-none focus:border-gray-400 focus:ring-0"
            type="text" placeholder="Type to add new tasks" />
        <button class="bg-blue-500 hover:bg-blue-600 text-white font-bold py-2 px-4 rounded" type="submit">Add Task</button>
    </form>
</template>此表单将包含一个具有v-model属性的输入元素。newTask数据字段现在将通过双向绑定绑定到输入元素的值。
您可以看到表单元素具有@submit.prevent属性。当表单提交时,这将调用addTask方法,该方法将文本打印到控制台。@符号是v-on:的简写。prevent 修饰符阻止表单的默认行为,即重新加载页面。
3.2:更新 App 组件
然后我们可以简单地将它添加到我们任务列表上方的App组件中
<script setup>
import Task from './components/Task.vue';
import TaskForm from './components/TaskForm.vue';
import { subscribe, autorun } from 'vue-meteor-tracker';
import { TasksCollection } from '../api/tasksCollection';

subscribe('tasks');
const tasks = autorun(() => TasksCollection.find({}).fetch()).result;
</script>

<template>
  <div class="container">
    <header>
      <h1 class="text-4xl font-bold text-gray-800 my-4">Todo List</h1>
    </header>
    <TaskForm />
    <ul class="list-disc list-inside p-4">
      <Task v-for="task of tasks" :key="task._id" :task="task" />
    </ul>
  </div>
</template>
3.3:添加插入操作
现在您可以编辑addTask函数以将新任务插入到数据库中。为此,我们需要实现一个 Meteor 方法。
方法本质上是对服务器的 RPC 调用,允许您安全地在服务器端执行操作。您可以在这里阅读更多关于 Meteor 方法的信息here。
要创建您的方法,您可以创建一个名为tasksMethods.js的文件。
import { Meteor } from 'meteor/meteor';
import { check } from 'meteor/check';
import { TasksCollection } from './tasksCollection';

async function insertTask(text) {
    check(text, String);
    return await TasksCollection.insertAsync({
        text,
        createdAt: new Date,
    });
}

Meteor.methods({ insertTask });请记住在main.js服务器文件中导入您的方法。
import { Meteor } from 'meteor/meteor';
import { TasksCollection } from '../imports/api/tasksCollection';
import '../imports/api/tasksPublications';
import '../imports/api/tasksMethods';现在,我们可以从我们的TaskForm.vue组件中调用此方法。
<script setup>
import { ref } from 'vue';
import { Meteor } from 'meteor/meteor';

const newTask = ref('');

const addTask = async () => {
  await Meteor.callAsync('insertTask', newTask.value.trim());
  newTask.value = '';
}
</script>在函数内部,我们通过调用Meteor.callAsync()将任务添加到tasks集合中。第一个参数是我们想要调用的方法的名称,第二个参数是任务的文本。我们还修剪文本以去除任何额外的空格。
3.5:首先显示最新的任务
现在,您只需要进行一项更改,这将改善用户体验:我们将首先显示最新的任务。我们可以通过对我们的MongoDB查询进行排序来快速实现这一点。
...
const tasks = autorun(() => {
return TasksCollection.find({}, { sort: { createdAt: -1 } }).fetch();
}).result;
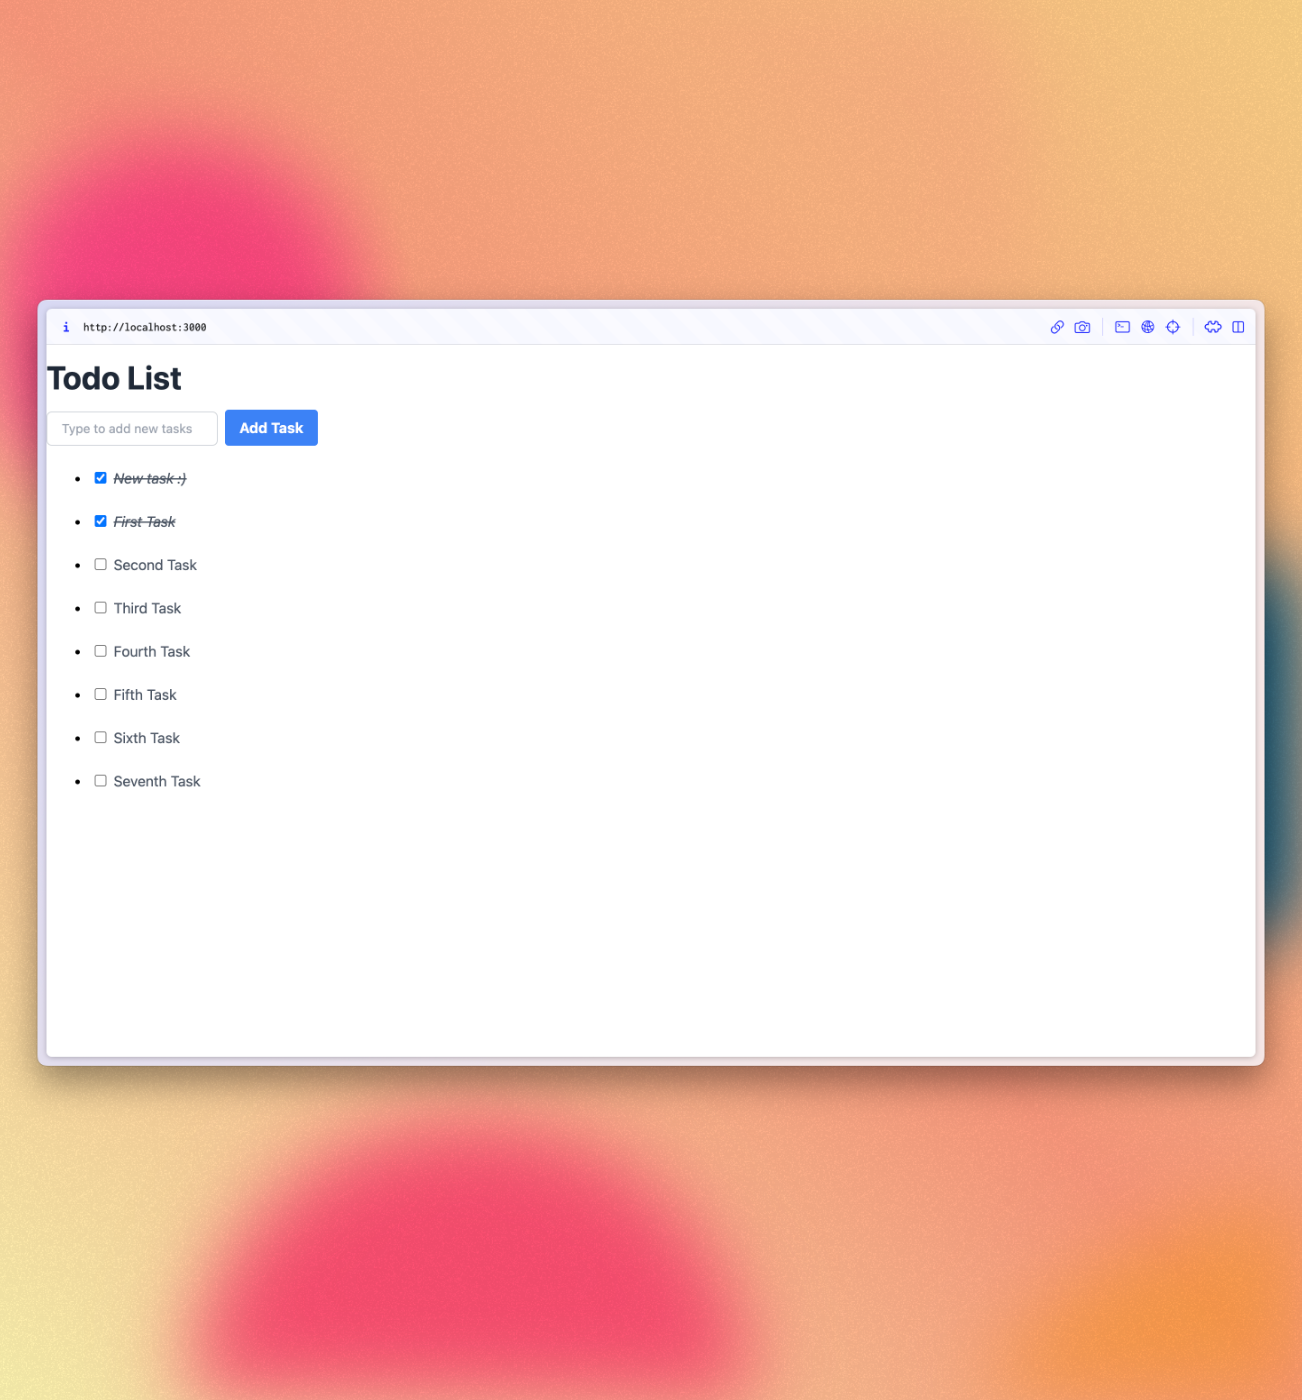
...您的应用程序应如下所示
4:更新和删除
到目前为止,您只将文档插入到我们的集合中。让我们看看如何使用用户界面更新和删除它们。
4.1:添加复选框
首先,您需要将checkbox元素添加到您的Task组件中,并且我们需要将v-model指令添加到复选框中。这将允许我们将复选框的值绑定到任务文档的checked字段。
为此,我们需要向任务文档添加一个ref。这将允许我们在模板中访问任务文档。并为复选框的状态管理添加一个计算属性isChecked。
我们还有一个名为task的 prop 传递给组件。此 prop 是一个表示任务文档的对象。
<script setup>
import { ref, computed } from 'vue';

const props = defineProps({
  task: {
    type: Object,
    required: true,
  },
});

const taskRef = ref({ ...props.task }); // Create a reactive copy of the task

const isChecked = computed(() => taskRef.value.checked);

</script>

<template>
  <div class="flex items-center rounded px-4 py-2 mb-2">
    <li>
      <input v-model="taskRef.checked" type="checkbox" :checked="isChecked" @change="handleCheckboxChange" />
    </li>
    <span class="text-gray-600 pl-2" :class="{ 'text-gray-400 italic line-through': taskRef.checked }">
      {{ task.text }}
    </span>
  </div>
</template>
 ..
4.2:切换复选框
我们需要实现更新任务文档的方法。因此,使用以下代码更新tasksMethods.js文件
import { Meteor } from 'meteor/meteor';
import { check } from 'meteor/check';
import { TasksCollection } from './tasksCollection';

async function insertTask(text) {
    check(text, String);
    return await TasksCollection.insertAsync({
        text,
        createdAt: new Date,
    });
}

async function removeTask(taskId) {
    check(taskId, String);
    await TasksCollection.removeAsync(taskId);
}

async function setIsCheckedTask(taskId, checked) {
    check(taskId, String);
    check(checked, Boolean);

    await TasksCollection.updateAsync(taskId, {
        $set: {
            checked
        }
    });
}

Meteor.methods({ insertTask, removeTask, setIsCheckedTask });集合上的updateAsync函数接受两个参数。第一个是标识集合子集的选择器,第二个是指定对匹配对象应执行的操作的更新参数。
在这种情况下,选择器只是相关任务的_id。更新参数使用$set,在我们的方法中,切换checked字段,这将表示任务是否已完成。
在客户端,您需要添加一个函数来处理复选框更改事件。此方法更新本地taskRef.checked状态并处理 Meteor 调用以更新任务的选中状态。它封装了您在复选框选中或取消选中时要执行的任何逻辑。
<script setup>
import { ref, computed } from 'vue';

const props = defineProps({
    task: {
      type: Object,
      required: true,
    },
});

const taskRef = ref({ ...props.task });

const isChecked = computed(() => taskRef.value.checked);

const handleCheckboxChange = async (event) => {
    const newCheckedValue = event.target.checked;
    taskRef.value.checked = newCheckedValue;

    try {
      await Meteor.callAsync('setIsCheckedTask', taskRef.value._id, newCheckedValue);
    } catch (error) {
      console.error('Error updating task checked state:', error);
    }
};
</script>

<template>
  <div class="flex items-center rounded px-4 py-2 mb-2">
    <li>
      <input v-model="taskRef.checked" type="checkbox" :checked="isChecked" @change="handleCheckboxChange" />
    </li>
    <span class="text-gray-600 pl-2" :class="{ 'text-gray-400 italic line-through': taskRef.checked }">
      {{ task.text }}
    </span>
  </div>
</template>
您的应用程序应如下所示
4.3:删除任务
您可以用几行代码删除任务。
首先在您的Task组件中的文本后添加一个按钮并接收一个回调函数。
...
<span class="text-gray-600 pl-2" :class="{ 'text-gray-400 italic line-through': taskRef.checked }">
{{ task.text }}
</span>
<button
class="ml-auto bg-red-500 hover:bg-red-600 text-white font-bold py-0.5 px-2 rounded"
@click="deleteTask"> ×
</button>
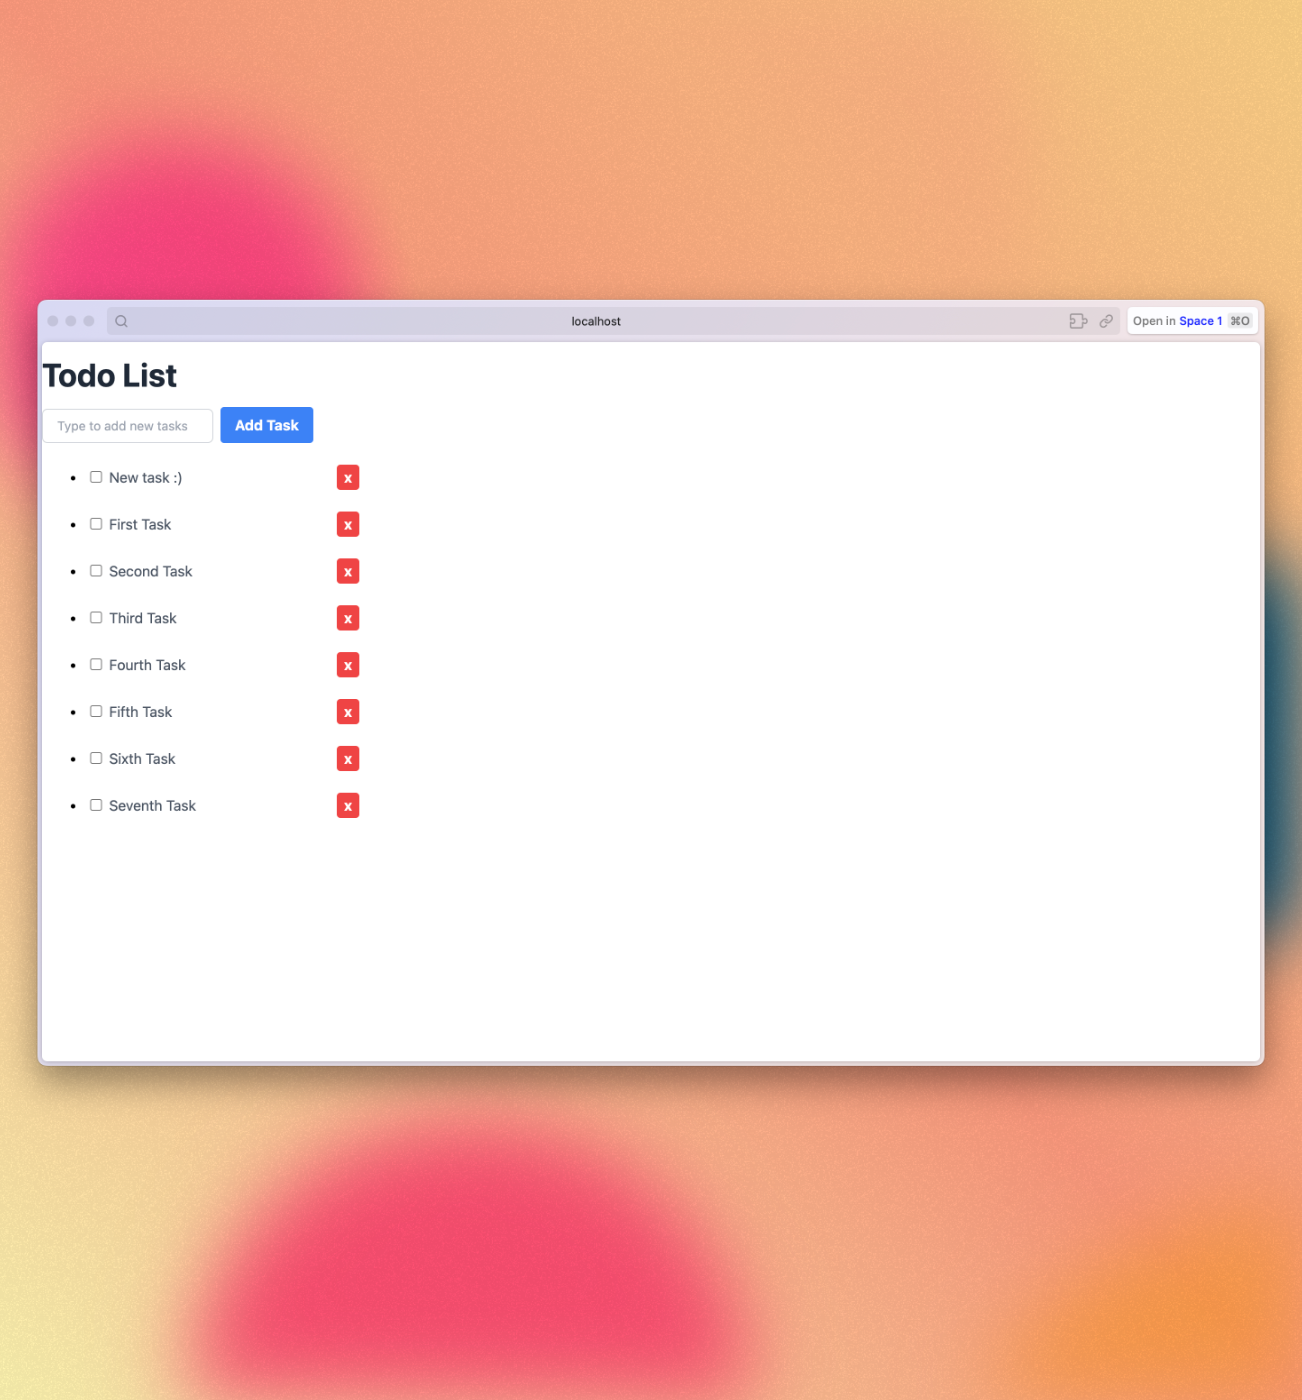
...现在将删除逻辑添加到方法中
...
const deleteTask = async () => {
  try {
    await Meteor.callAsync('removeTask', taskRef.value._id);
  } catch (error) {
    console.error('Error deleting task:', error);
  }
};
...
您的应用程序应如下所示
5:样式
5.1:Tailwind CSS
到目前为止,我们的用户界面看起来不太好。让我们添加一些基本样式来为更专业的应用程序创建基础。我们将从 App 组件开始。
<template>
<header class="flex items-center justify-between px-4 py-4 bg-gray-100 border-t border-b border-gray-200">
<h1 class="text-4xl font-bold text-gray-800 my-4">🚀 To-Do List</h1>
</header>
<div class="mx-auto max-w-2xl px-4 py-8 sm:px-6 lg:px-8">
<div class="mb-8 md:w-96 md:mx-auto md:mb-0 md:mt-8 md:px-4 md:py-8 text-center md:bg-gray-100 md:rounded-lg">
<TaskForm />
<ul class="list-none list-inside pt-4 md:w-96">
<Task v-for="task of tasks" :key="task._id" :task="task" />
</ul>
</div>
</div>
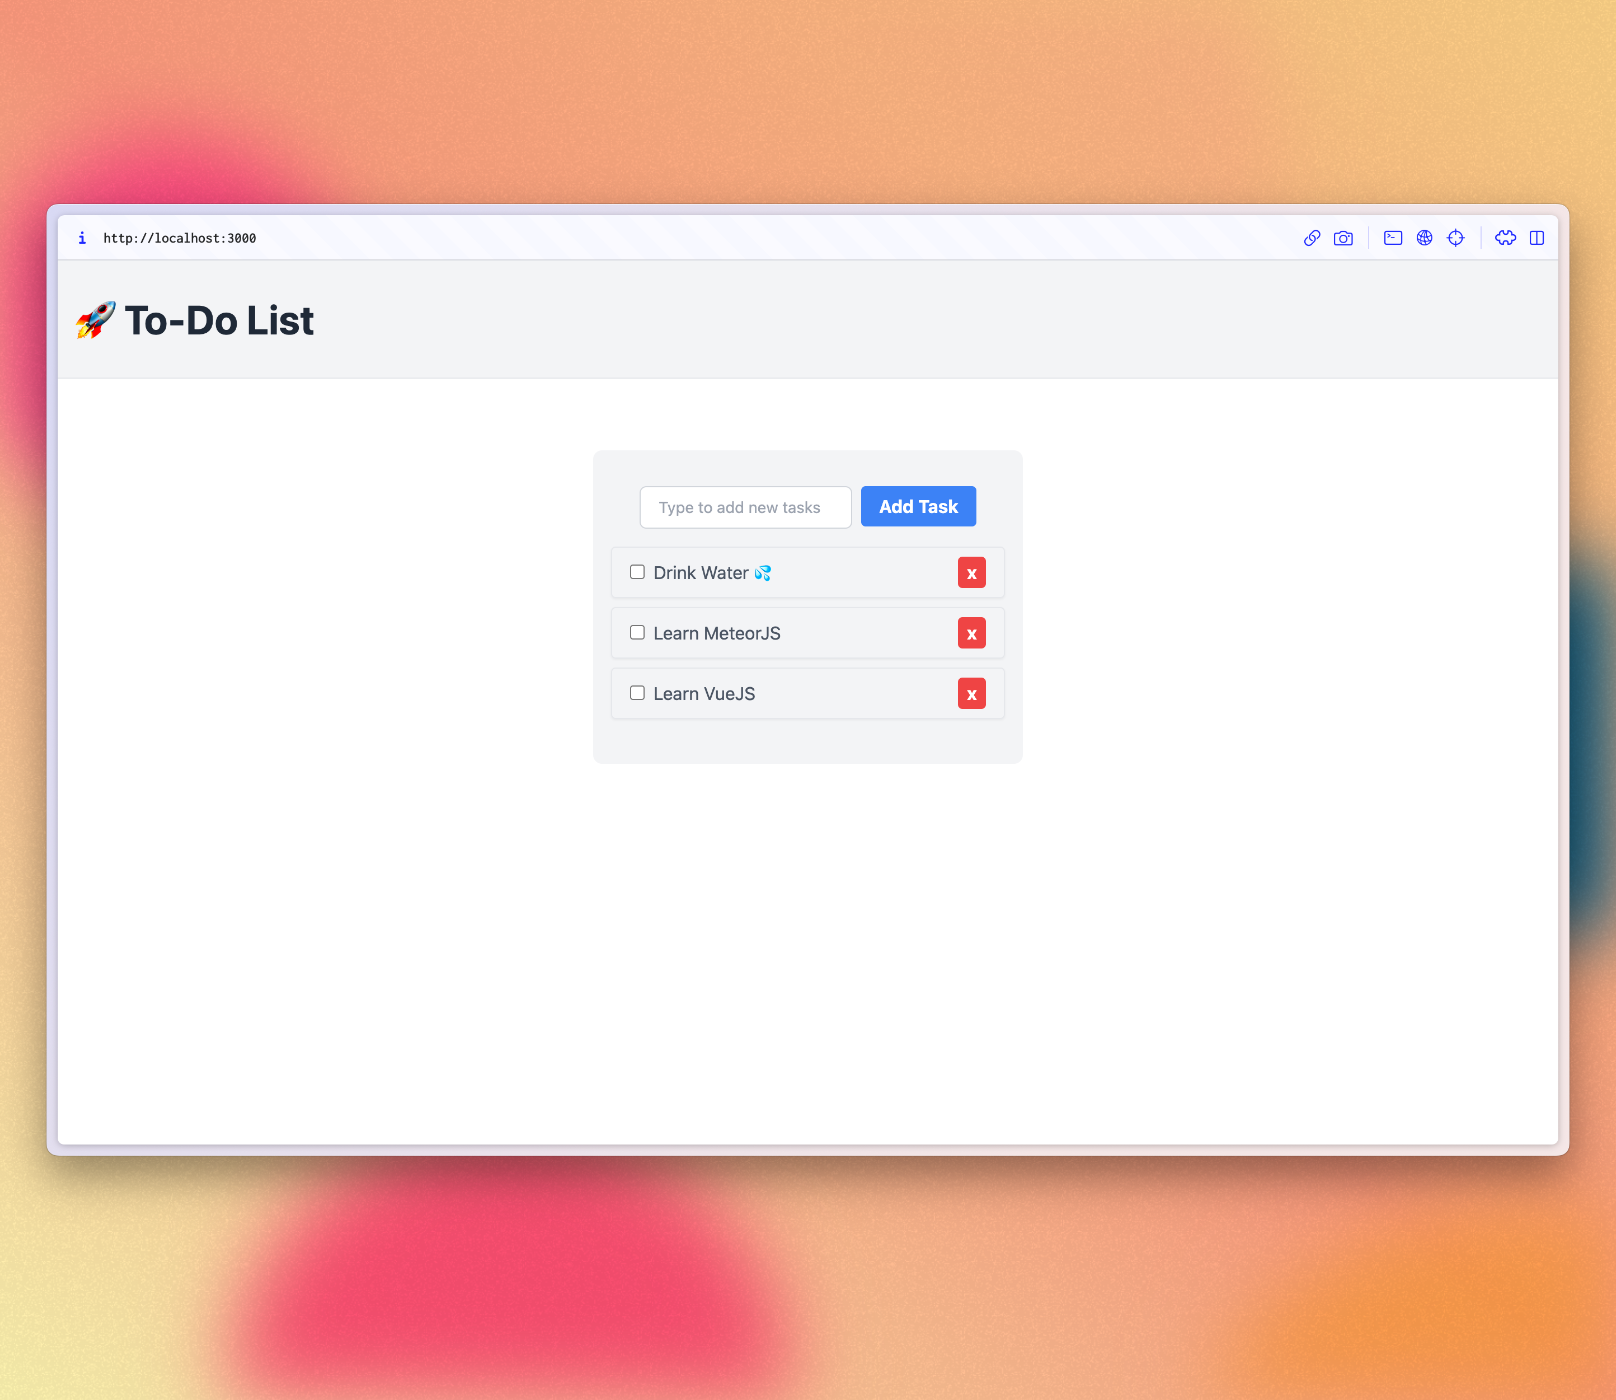
</template>Flexbox 是一个在 UI 中分配和对齐元素的优秀工具。查看此文章以了解更多关于Tailwind CSS的信息,这是我们本教程中使用的 CSS 框架。
我们还将更新TaskForm组件和Task组件。
<template>
  <form @submit.prevent="addTask">
    <input
        v-model="newTask"
        class=" border border-gray-300 rounded-md py-2 px-4 mr-2 text-gray-600 text-sm focus:outline-none focus:border-gray-400 focus:ring-0"
        type="text" placeholder="Type to add new tasks" />
    <button class="bg-blue-500 hover:bg-blue-600 text-white font-bold py-1.5 px-4 rounded" type="submit">Add Task</button>
  </form>
</template><template>
<div class="flex items-center rounded p-4 py-2 mb-2 shadow-sm border border-gray-200 md:mr-8">
<li>
<input v-model="taskRef.checked" type="checkbox" readonly :checked="isChecked" @change="handleCheckboxChange" />
</li>
<span class="text-gray-600 pl-2" :class="{ 'text-gray-400 italic line-through': taskRef.checked }">
{{ task.text }}
</span>
<button class="ml-auto bg-red-500 hover:bg-red-600 text-white font-bold py-0.5 px-2 rounded" @click="deleteTask">
×
</button>
</div>
</template>您的应用程序应如下所示
在下一步中,我们将使此任务列表更具交互性,提供一种过滤任务的方法。
6:过滤任务
在此步骤中,您将按状态过滤任务并显示待处理任务的数量。
6.1:过滤任务
首先,您将添加一个按钮以显示或隐藏列表中的已完成任务
<div class="mb-8 md:w-96 md:mx-auto md:mb-0 md:mt-8 md:px-4 md:py-8 text-center md:bg-gray-100 md:rounded-lg">
    <TaskForm />
    <div>
      <button class="text-sm font-semibold text-gray-600 hover:text-gray-800" @click="toggleHideCompleted">
        <span v-if="hideCompleted">Show all</span>
        <span v-else>Hide completed</span>
      </button>
    </div>
    <ul class="list-none list-inside pt-4 md:w-96">
      <Task v-for="task of tasks" :key="task._id" :task="task" />
    </ul>
</div>您可以看到它读取自hideCompleted。我们需要使用脚本部分中的ref初始化hideCompleted的值
...
import { ref } from 'vue';

const hideCompleted = ref(false);

subscribe('tasks');
...我们可以直接从事件处理程序更新hideCompleted,这将导致组件重新渲染
...
const toggleHideCompleted = () => {
  hideCompleted.value = !hideCompleted.value
};
</script>
...现在,我们需要更新任务列表,以便在hideCompleted为true时过滤掉已完成的任务。
imports/ui/App.vue
...

subscribe('tasks');

const tasks = autorun(() => {
  const filter = hideCompleted.value ? { checked: { $ne: true } } : {};
  return TasksCollection.find(filter, { sort: { createdAt: -1 } }).fetch();
}).result;

...
将一些任务标记为已完成,以便您可以检查过滤器行为。
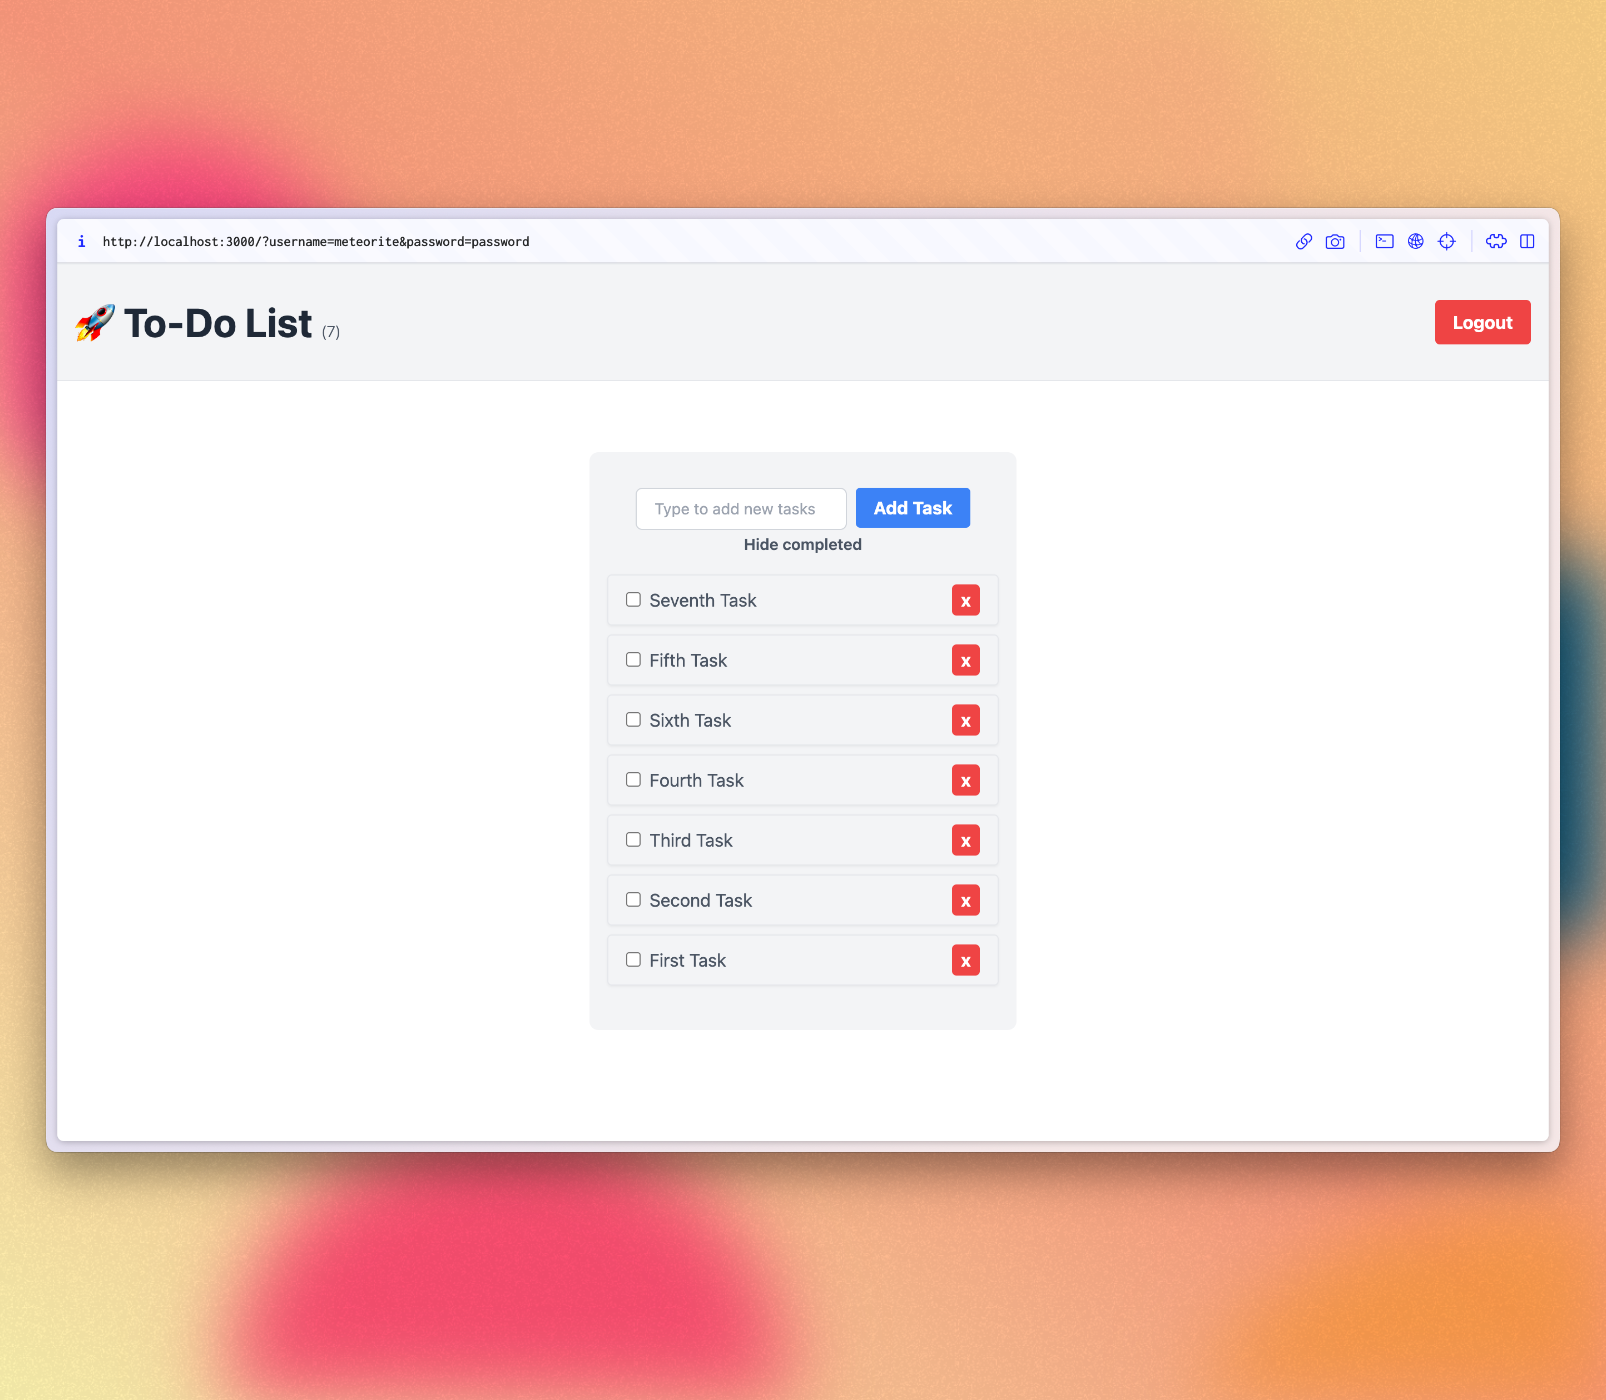
6.2:待处理任务
更新 App 组件以在应用栏中显示待处理任务的数量。
当没有待处理任务时,您应该避免向应用栏添加零。
<script setup>
...
const incompleteTasksCount = autorun(() => {
  return TasksCollection.find({ checked: { $ne: true } }).count();
}).result;
...
</script>

<template>
...
  <h1 class="text-4xl font-bold text-gray-800 my-4">🚀 To-Do List
    <span v-if="incompleteTasksCount > 0" class="text-xl font-light text-gray-600">({{ incompleteTasksCount }})</span>
  </h1>
...
</template>
此时,您的应用程序应如下所示

7:添加用户帐户
7.1:密码身份验证
Meteor 已经自带了身份验证和帐户管理系统,因此您只需要添加accounts-password包即可启用用户名和密码身份验证
meteor add accounts-password还有许多其他身份验证方法受支持。您可以在这里阅读更多关于帐户系统的信息here。
我们还建议您安装bcrypt节点模块,否则您将看到一条警告,提示您正在使用它的纯 JavaScript 实现。
meteor npm install --save bcrypt您应该始终使用
meteor npm而不是仅使用npm,以便始终使用 Meteor 固定版本的npm,这有助于避免由于不同版本的 npm 安装不同模块而导致的问题。
7.2:创建用户帐户
现在,您可以为我们的应用程序创建一个默认用户。如果我们没有在数据库中找到用户,我们将创建一个新用户以启动服务器。让我们为用户创建和任务创建创建特定的函数,然后在Meteor.startup()中调用两者。
import { Meteor } from 'meteor/meteor';
import { Accounts } from 'meteor/accounts-base';
import { TasksCollection } from '../imports/api/tasksCollection';
import '../imports/api/tasksPublications';
import '../imports/api/tasksMethods';

const SEED_USERNAME = 'meteorite';
const SEED_PASSWORD = 'password';

const createFirstUser = async () => {
  const user = await Accounts.findUserByUsername(SEED_USERNAME);
  if (!user) {
    await Accounts.createUserAsync({
      username: SEED_USERNAME,
      password: SEED_PASSWORD,
    });
  }
}

const insertTask = async text => await TasksCollection.insertAsync({text});

const createTasks = async () => {
  const tasksCount = await TasksCollection.find().countAsync();
  if (tasksCount === 0) {
    await insertTask('First Task');
    await insertTask('Second Task');
    await insertTask('Third Task');
    await insertTask('Fourth Task');
    await insertTask('Fifth Task');
    await insertTask('Sixth Task');
    await insertTask('Seventh Task');
  }
}

Meteor.startup(async () => {
  await createFirstUser();
  await createTasks();
});
您现在在应用程序 UI 中应该看不到任何区别。
7.3:登录表单
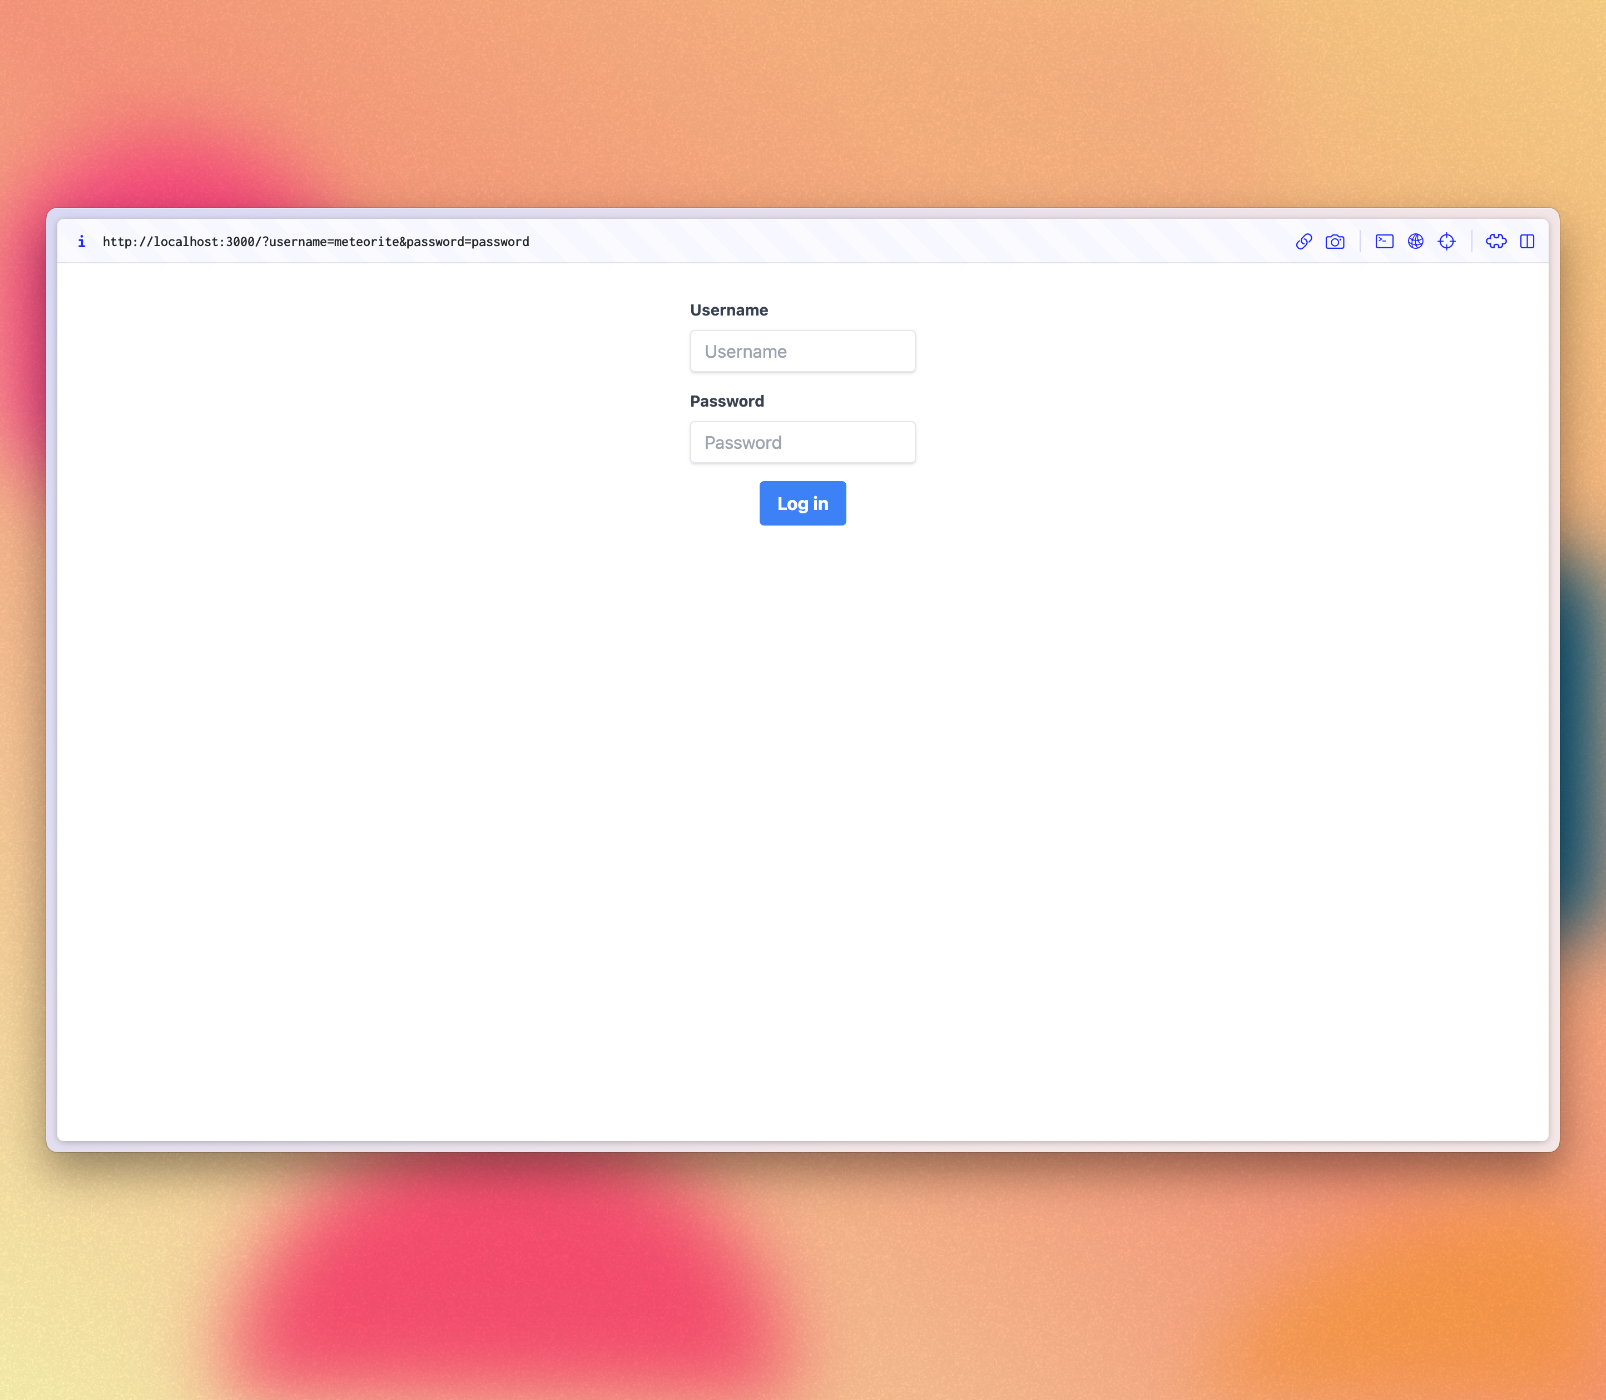
您需要为用户提供一种输入其凭据并登录的方法。为此,我们需要一个表单。
创建一个名为LoginForm.vue的新文件,并在其中添加一个表单。使用Meteor.loginWithPassword(username, password)通过提供的用户信息登录用户。
<script setup>
import { Meteor } from 'meteor/meteor';
import { ref } from 'vue';

const username = ref('');
const password = ref('');

const login = () => {
  Meteor.loginWithPassword(username.value, password.value);
}
</script>

<template>
  <form class="flex flex-col justify-center items-center w-full max-w-md mx-auto my-8" @submit.prevent="login">
    <div>
      <label for="username" class="block text-gray-700 text-sm font-bold mb-2">Username</label>
      <input v-model="username" type="text" name="username" placeholder="Username" required
             class="shadow appearance-none border rounded w-full py-2 px-3 text-gray-700 leading-tight focus:outline-none focus:shadow-outline">
    </div>

    <div class="mt-4">
      <label for="password" class="block text-gray-700 text-sm font-bold mb-2">Password</label>
      <input v-model="password" type="password" name="password" placeholder="Password" required
             class="shadow appearance-none border rounded w-full py-2 px-3 text-gray-700 leading-tight focus:outline-none focus:shadow-outline">
    </div>

    <div>
      <button type="submit"
              class="bg-blue-500 hover:bg-blue-700 text-white font-bold py-2 mt-4 px-4 rounded focus:outline-none focus:shadow-outline">
        Log in
      </button>
    </div>
  </form>
</template>
7.4: 要求身份验证
我们的应用程序应该只允许已认证的用户访问任务管理功能。
我们可以通过在没有已认证用户时显示LoginForm组件来实现这一点。如果用户已登录,我们将显示任务列表。
我们需要一个ref来检查用户是否已登录,一个userId变量来存储用户数据,以及一些使用watch的逻辑,以便在用户更改时更新isLogged ref。
...
import { Meteor } from 'meteor/meteor';
import { ref, watch } from 'vue';

const hideCompleted = ref(false);
const isLogged = ref(false);

const userId = autorun(() => Meteor.userId()).result;

watch(
  () => userId.value,
  (newUser) => {
    isLogged.value = !!newUser
  },
  { immediate: true }
);
...接下来,我们可以将用户功能包装在一个<div>标签中,并使用v-if指令仅在用户登录时显示这些功能
<script setup>
...
import LoginForm from './components/LoginForm.vue';
...
</script>

<template>
  <div v-if="isLogged">
    <header class="flex items-center justify-between px-4 py-4 bg-gray-100 border-t border-b border-gray-200">
      <h1 class="text-4xl font-bold text-gray-800 my-4">🚀 To-Do List
        <span v-if="incompleteTasksCount > 0" class="text-xl font-light text-gray-600">({{ incompleteTasksCount }})</span>
      </h1>
    </header>
    <div class="mx-auto max-w-2xl px-4 py-8 sm:px-6 lg:px-8">
      <div class="mb-8 md:w-96 md:mx-auto md:mb-0 md:mt-8 md:px-4 md:py-8 text-center md:bg-gray-100 md:rounded-lg">
        <TaskForm />
        <div>
          <button class="text-sm font-semibold text-gray-600 hover:text-gray-800" @click="toggleHideCompleted">
            <span v-if="hideCompleted">Show all</span>
            <span v-else>Hide completed</span>
          </button>
        </div>
        <ul class="list-none list-inside pt-4 md:w-96">
          <Task v-for="task of tasks" :key="task._id" :task="task" />
        </ul>
      </div>
    </div>
  </div>

  <div v-else>
    <LoginForm />
  </div>
</template>
7.5: 服务器启动
从现在开始,每个任务都必须有一个所有者。请转到您的数据库并删除所有任务
db.tasks.remove({});
然后,更新您的server/main.js,以使用您的meteoriote用户作为所有者添加种子任务。
import { Meteor } from 'meteor/meteor';
import { Accounts } from 'meteor/accounts-base';
import { TasksCollection } from '../imports/api/tasksCollection';
import '../imports/api/tasksPublications';
import '../imports/api/tasksMethods';

const SEED_USERNAME = 'meteorite';
const SEED_PASSWORD = 'password';

const createFirstUser = async () => {
  const user = await Accounts.findUserByUsername(SEED_USERNAME);
  if (!user) {
    await Accounts.createUserAsync({
      username: SEED_USERNAME,
      password: SEED_PASSWORD,
    });
  }
}

const insertTask = async (text, userId) => {
  await TasksCollection.insertAsync({text, userId, createdAt: new Date()});
}

const createTasks = async () => {
  const tasksCount = await TasksCollection.find().countAsync();
  if (tasksCount === 0) {
    const user = await Accounts.findUserByUsername(SEED_USERNAME);

    await insertTask('First Task', user._id);
    await insertTask('Second Task', user._id);
    await insertTask('Third Task', user._id);
    await insertTask('Fourth Task', user._id);
    await insertTask('Fifth Task', user._id);
    await insertTask('Sixth Task', user._id);
    await insertTask('Seventh Task', user._id);
  }
}

Meteor.startup(async () => {
  await createFirstUser();
  await createTasks();
});请注意,我们正在使用一个名为userId的新字段,其中包含我们的用户_id字段,我们还设置了createdAt字段。
转到任务发布并向查找选择器添加userId,以便用户只能看到他们自己的任务。
import { Meteor } from 'meteor/meteor';
import { TasksCollection } from './tasksCollection';

Meteor.publish('tasks', function publishTasks() {
  return TasksCollection.find({ userId: Meteor.userId() });
});在测试之前,请确保在进行此更改后重新启动服务器,以便Meteor.startup块再次运行。由于您正在更改服务器端代码,因此这很可能会自动发生。
7.7: 任务所有者
任务在发布中通过其所有者进行过滤,使用已认证的用户,但我们也应该在 UI 中过滤任务。使用用户的_id在从 Minimongo 检索任务时将userId字段添加到您的 MongoDB 选择器。
您的tasks函数应如下所示
<script setup>
...
const userId = autorun(() => Meteor.userId()).result;

watch(
  () => userId.value,
  (newUserId) => {
    isLogged.value = !!newUserId
  },
  { immediate: true }
);

subscribe('tasks');

const tasks = autorun(() => {
  const filter = hideCompleted.value ? { checked: { $ne: true }, userId: userId.value } : { userId: userId.value };
  return TasksCollection.find(filter, { sort: { createdAt: -1 } }).fetch();
}).result;

const incompleteTasksCount = autorun(() => {
  return TasksCollection.find({ checked: { $ne: true }, userId: userId.value }).count()
}).result;

...
</script>
7.8: 注销
我们可以在h1之后立即包含一个新的button。在这个按钮上,您可以添加一个onClick处理程序以注销用户。这非常简单,只需在其上调用Meteor.logout()即可。
<script setup>
...
const logout = () => Meteor.logout();
...
</script>

<h1 class="text-4xl font-bold text-gray-800 my-4">🚀 To-Do List
  <span v-if="incompleteTasksCount > 0" class="text-xl font-light text-gray-600">({{ incompleteTasksCount }})</span>
</h1>

<button
  class="bg-red-500 hover:bg-red-600 text-white font-bold py-2 px-4 rounded focus:outline-none focus:shadow-outline"
  @click="logout">
      Logout
</button>
...
现在我们有了身份验证,我们可以在服务器端添加一个检查,以确保只有登录的用户才能删除、更新或添加新任务。
我们可以通过将以下代码添加到每个tasksMethods的on来实现这一点
if (!Meteor.userId()) {
 throw new Meteor.Error('Not authorized.');
}请按照您的tasksMethods应有的样子进行操作
import { Meteor } from 'meteor/meteor';
import { check } from 'meteor/check';
import { TasksCollection } from './tasksCollection';

async function insertTask(text) {
    check(text, String);
    if (!Meteor.userId()) {
        throw new Meteor.Error('Not authorized.');
    }
    return await TasksCollection.insertAsync({
        text,
        userId: Meteor.userId(),
        createdAt: new Date,
    });
}

async function removeTask(taskId) {
    check(taskId, String);
    if (!Meteor.userId()) {
        throw new Meteor.Error('Not authorized.');
    }
    await TasksCollection.removeAsync(taskId);
}

async function setIsCheckedTask(taskId, checked) {
    check(taskId, String);
    check(checked, Boolean);

    if (!Meteor.userId()) {
        throw new Meteor.Error('Not authorized.');
    }

    await TasksCollection.updateAsync(taskId, {
        $set: {
            checked
        }
    });
}

Meteor.methods({ insertTask, removeTask, setIsCheckedTask });
呼!您在此步骤中做了很多工作。对用户进行身份验证,在任务中设置用户并为用户提供注销的方法。
您的应用程序应如下所示
8: 部署
部署 Meteor 应用程序类似于部署任何其他使用 WebSockets 的 Node.js 应用程序。您可以在我们的指南中找到部署选项,包括 Meteor Up、Docker 和我们推荐的方法 Galaxy。
在本教程中,我们将把我们的应用程序部署到Galaxy,这是我们自己的云解决方案。Galaxy 提供免费计划,因此您可以部署和测试您的应用程序。非常酷,对吧?
8.1: 创建您的帐户
您需要一个 Meteor 帐户才能部署您的应用程序。如果您还没有帐户,可以在此处注册。使用此帐户,您可以访问我们的软件包管理器Atmosphere、论坛等。
8.2: 设置 MongoDB(可选)
由于您的应用程序使用 MongoDB,因此第一步是设置 MongoDB 数据库,Galaxy 为测试目的提供免费计划的 MongoDB 托管,您还可以请求生产就绪型数据库以允许您进行扩展。
在任何 MongoDB 提供商中,您将拥有一个 MongoDB URL,您必须使用它。如果您使用 Galaxy 提供的免费选项,则会为您完成初始设置。
Galaxy MongoDB URL 将类似于:mongodb://username:<password>@org-dbname-01.mongodb.galaxy-cloud.io。
8.3: 设置设置
您需要创建一个设置文件,它是一个 JSON 文件,Meteor 应用程序可以从中读取配置。在项目根目录下的一个名为private的新文件夹中创建此文件。重要的是要注意,private是一个特殊文件夹,不会发布到应用程序的客户端。
确保您将Your MongoDB URL替换为您自己的 MongoDB URL 😃
{
  "galaxy.meteor.com": {
    "env": {
      "MONGO_URL": "Your MongoDB URL"
    }
  }
}
8.4: 部署它
现在您可以开始部署了,在部署之前运行meteor npm install以确保所有依赖项都已安装。
您还需要选择一个子域来发布您的应用程序。我们将使用免费且包含在任何 Galaxy 计划中的主域meteorapp.com。
在此示例中,我们将使用vue3-meteor-3.meteorapp.com,但请确保选择一个不同的子域,否则您将收到错误。
您可以在此处了解如何在 Galaxy 上使用自定义域。自定义域从 Essentials 计划开始可用。
运行部署命令
meteor deploy vue3-meteor-3.meteorapp.com --free --mongo如果您没有使用 Galaxy 上带有 MongoDB 的免费托管,则从部署脚本中删除
--mongo标志,并使用应用程序的正确设置添加--settings private/settings.json。
确保将vue3-meteor-3替换为您想要作为子域的自定义名称。您将看到如下所示的日志
meteor deploy vue3-meteor-3.meteorapp.com --settings private/settings.json
Talking to Galaxy servers at https://us-east-1.galaxy-deploy.meteor.com
Preparing to build your app...
Preparing to upload your app...
Uploaded app bundle for new app at vue-tutorial.meteorapp.com.
Galaxy is building the app into a native image.
Waiting for deployment updates from Galaxy...
Building app image...
Deploying app...
You have successfully deployed the first version of your app.
For details, visit https://galaxy.meteor.com/app/vue3-meteor-3.meteorapp.com
此过程通常只需要几分钟,但它取决于您的互联网速度,因为它会将您的应用程序包发送到 Galaxy 服务器。
Galaxy 构建一个包含您的应用程序包的新 Docker 镜像,然后使用它部署容器,阅读更多。
您可以在 Galaxy 上检查您的日志,包括 Galaxy 正在构建您的 Docker 镜像并部署它的部分。
8.5: 访问应用程序并享受
现在您应该能够在https://galaxy.meteor.com/app/vue3-meteor-3.meteorapp.com访问您的 Galaxy 仪表板。
您还可以访问当前处于测试版的 Galaxy 2.0,网址为https://galaxy-beta.meteor.com/<your-username>/us-east-1/apps/<your-app-name>.meteorapp.com。请记住使用您自己的子域而不是vue3-meteor-3。
您可以通过vue3-meteor-3.meteorapp.com访问应用程序!只需使用您的子域访问您的应用程序!
我们部署到在美国(us-east-1)运行的 Galaxy,我们还在世界其他地区运行 Galaxy,请查看此处的列表。
这太棒了,您的应用程序已在 Galaxy 上运行,随时可以供世界上任何人使用!
9: 下一步
您已完成本教程!
到目前为止,您应该已经对使用 Meteor 和 Vue 有了很好的了解。
信息
你可以在我们的 GitHub 仓库 中找到此应用的最终版本。
以下是一些您可以下一步执行的操作选项
- 查看完整的文档以了解有关 Meteor 3 的更多信息。
- 阅读Galaxy 指南以了解有关部署应用程序的更多信息。
- 加入我们位于Meteor 论坛和Discord 上的 Meteor 休息室的社区,以提出问题并分享您的经验。
我们迫不及待地想看看您接下来会构建什么!